Why Photoshop?I guess the first thing to think about is 'Why Photoshop'? Why should you bother spending the time to use this software? The reasons can vary, but it comes down to a few key thoughts. Photoshop is the premiere software for manipulating images. It can also be used to design an infinite number of projects. So if you have any need to work with digital (or scanned) photographs, or want to create brochures, or images for websites, or a poster for your lost kitten - Photoshop is a great tool to have.
Now Photoshop is not the only tool for these uses, but it is the most popular because it is so versatile. It is also an 'industry standard', meaning that if you were to work with digital imagery professionally, your employer would expect you to know how to use Photoshop. So there's your second reason for learning it.
So in a nutshell, Photoshop is versatile, powerful and popular. If it's graphic design or digital imaging you're after - it's a great program to know.
What is needed?What you need to start your adventure is a working copy of Photoshop. It doesn't really matter what version you are using, but the tutorials are based on Photoshop CS3. If you are using an older version, you will notice some differences, and there may be missing items in your copy. Don't despair, though - you'll be able to figure it out.
The Photoshop ScreenBelow is a screenshot that shows what Photoshop looks like. Move your mouse over each section to see what the different areas are called. Below we'll give you a short explanation of what they are, and then expand that information in later tutorials.
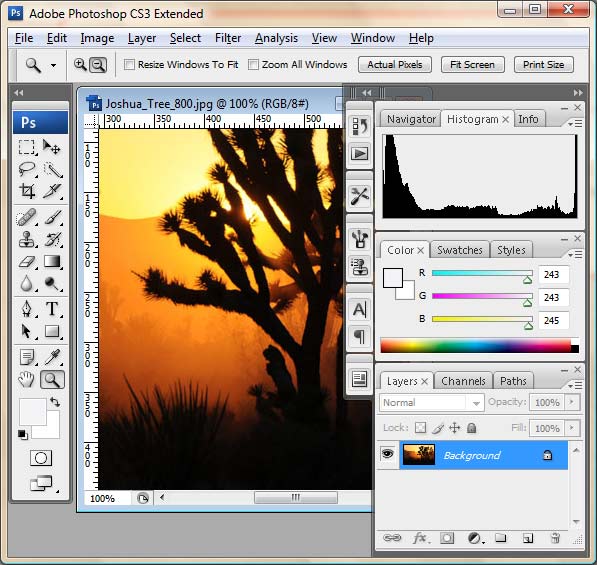
Starting from the top, here's what the different areas of the screen are for:
Title Bar - this is at the top of most program screens and shows what the program is (and in this case which version) at the right side is the "X" to close the application, and the other buttons to minimize or shrink the window that program is using. There are similar buttons at the top right of the workspace.
Menu Bar - this area holds all the drop down menus. For example, if you want to see a list of filters, click on the Filters to see a complete list of filters that are installed. Many of the options you'll use are in these menus. For working with photographs, the Image menu will be used extensively.
Option Bar - this area changes depending upon which tool is being used. For example, if you have the Crop tool active, you will various options specific to the Crop tool such as crop size and resolution.
Toolbar - the toolbar contains the most common tools and is usually kept on the screen at all times. For most work in Photoshop, you will be using these extensively. The tutorials in this level will get you up to speed on what they all do.
Filename - This bar shows the file you are either working on, or if you have multiple files open, each file will have a title bar so that you don't get confused.
Ruler - you have the option of turning the rulers on or off, but if they are on you can choose different units such as pixels or inches. These are handy when creating designs that require specific sizes or spacing.
Workspace - This is where the action happens. This area contains your design or your photo. You can vary the size of the workspace window, zoom in or out, add guides for placement, etc.
Docked Windows / Palettes - In later version of Photoshop, you can dock windows that you aren't using often to free up screen space (which is important as you'll see). You can quickly expand a docked window to make adjustments and then close it. For example, you can edit text with the Character Window and then close it.
Histogram Window - This window is used extensively in photo work as it shows the image's exposure range. In this example, it shows you what size a typical window or palette can be when you are working with them and have them visible.
Color Window - This is where you select colors (makes sense). For example if you want a design with a red background, you can select the color you want to use here.
Layers Window - Layers are used to displays different elements of your design in a proper sequence. For example, you would have text on one layer, and an photo on another layer. It would be important to have the text layer above the photo layer so that you can see the text in the image. Layer organization is important to have a smooth workflow.
So those are the main parts of the screen, the later tutorials will refer to them from time to time so it's good if you get to know them.
ToolbarBelow is an images that shows the default toolbar. At the very top, there are the arrows <> that allow you to expand or contract the toolbar depending on your needs. Below that is the Ps that will take you to the Adobe website to find out more about Photoshop. Next are are the tools that you will be using - some more than others. Just by looking at the names or the icon, you may be able guess what some of them do.
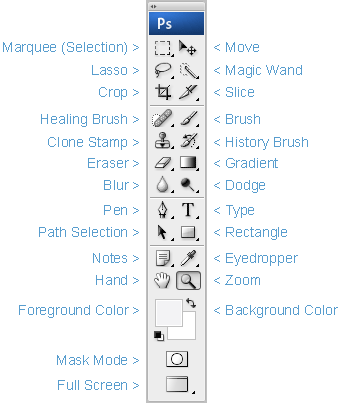
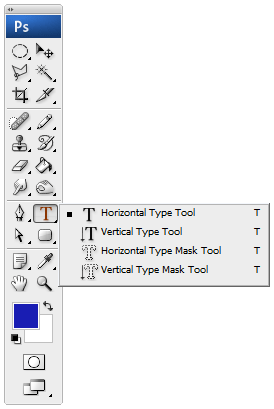
All of these tools will explained in depth in later tutorials, but for now it is good to start learning the names. You'll also notice that some tools have a small triangle and the bottom right. This indicates that the tool has a flyout that exposes more tools, or options of that tool. Below is an example of the Text Flyout. You see this when you left-click and hold over a tool.
 Conclusion
This tutorial has given you a brief introduction to Photoshop. Welcome to the creative world of Adobe Photoshop - have fun.


